 MemeMotion
Which AI video size should you choose?
Compare 9:16 portrait, 1:1 square, and 16:9 landscape. See how resolution and clip length affect the credit cost.
Published Updated
What's new on this page
- Added screenshots of the frame controls and a practical check for comparing ratios without changing the credit quote.
- Guide first published.
Use 9:16 for vertical feeds, 1:1 for a centered subject, or 16:9 to show more of the scene. Frame shape leaves the credit quote unchanged.
At a glance
| 9:16 portrait | Vertical feeds and upright subjects |
|---|---|
| 1:1 square | Centered action |
| 16:9 landscape | Wide scenes and groups |
Choose the frame for the scene
Frame shape is the ratio of the width to the height. A 9:16 clip is tall, a 1:1 clip is square, and a 16:9 clip is wide. Resolution describes image detail. A higher resolution can make the picture sharper, while choosing a different frame determines where the movement fits on screen.
Start with the composition in the selected reference if it already keeps the important action visible. You can change the frame in Choose quality and length. Before switching, watch the reference through its widest gesture and notice which parts of the scene would be difficult to fit into a narrower shot.
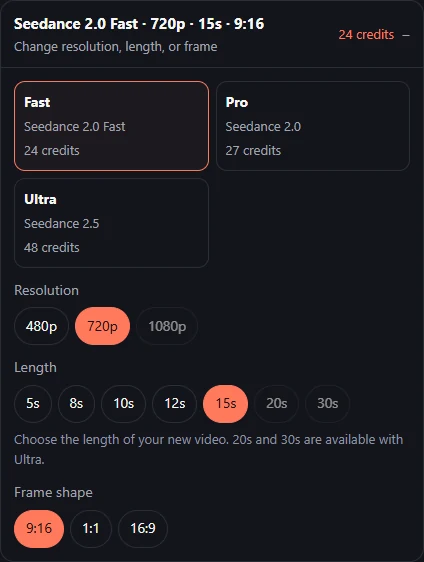
To change the ratio, open the settings panel, find Frame shape, and choose one of the three buttons. The selected ratio appears in the summary alongside the model, resolution, and length. Check that summary after switching effects, especially if the next effect starts from a reference with a different shape.
9:16 portrait for one subject or vertical feeds
Choose portrait when the clip is meant to fill a vertical feed. It works well for an upright animal or a solo performance with recurring gestures near the center. Look for an input photo with room above the subject’s head and, when feet or paws are important, below the body.
A vertical frame can also work for a duet when the subjects are close. For a reference where both dancers travel sideways, play the example before picking 9:16. Consider whether both people need to stay visible the whole time or whether a closer shot of the lead fits the planned edit.
1:1 square for a centered setup
Square gives you a middle option when the important part of the scene sits near the center. Hotel Lobby AI is a useful example because the reference fits two performers around a single hanging microphone. A square frame gives the performers space beside the mic while keeping the booth compact.
If the source photo is wide, focus on how much open space surrounds the subject. A centered photo with spare room is easier to use across multiple frame shapes than a photo with the face or body close to the side. Preview the finished composition to see whether a central gesture stays readable.
16:9 landscape for scenery and group movement
Choose landscape when the scene itself is part of the effect. The Vossi Bop AI reference uses a wide view where the bridge and London skyline help establish the location. A wide frame also works when the main performer and companions need to move or react next to each other.
To plan a landscape version for a wide post or a horizontal video edit, decide whether the scene needs to show the background, the whole body, or the people on both sides. If only one centered reaction matters, a portrait or square frame may put more attention on that subject.
Check the quality and credit quote
Frame shape does not change the credit cost. The model, resolution, and clip length do. The Fast model offers 480p and 720p, while Pro and Ultra also offer 1080p. Ultra supports additional 20- and 30-second options. Check the live quote when you change any of those settings.
If you are comparing compositions, keep the model, resolution, and length fixed and change just the frame. This lets you compare where the gestures land and how much of the background stays visible without changing the quote for that configuration.
In the Vossi Bop example shown here, switching from 9:16 to 16:9 leaves the credit quote unchanged. The selected model, resolution, and duration in the summary stay the same. Open the panel again and try a shorter length if the quote is higher than you want. Check the length against the moment you want to show before submitting.

Plan for where the video will be watched
For a phone feed, watch the result full-screen on a phone-sized view and check that the face and the key gesture stay near the middle. App controls often sit along the bottom or right. If you plan to add a caption in a separate editor, leave room for it away from the subject and those controls.
For a horizontal montage, use 16:9 when the joke depends on seeing who is beside the lead or where the scene happens. For a square post in a feed with mixed formats, check how both the first frame and the biggest reaction read at a glance. A brighter photo or a simpler reference can help more than raising the resolution when the action is hard to see.
Get the finished MP4
Open My Videos to play the result and download the MP4 within seven days of completion. Watch the opening and the widest movement in the clip. If a subject crowds the edge, compare the result with a wider ratio or a source photo with more space around the subject.
If you need both vertical and horizontal versions, decide which one is most important and choose its ratio before the first render. A second generation at the other ratio keeps the chosen output frame explicit. Review each clip independently because the generated movement or framing may vary.
View the wide Vossi Bop example Check pricing
Frequently asked questions
- Why are some choices unavailable?
- The model you select controls which resolutions and durations you can use.
- Can I use a different frame from the reference?
- Yes. Choose another frame shape in the generator and use a photo with some room around the subject.